


In this post, we’ll see how we can run our VPN server behind ALB and use NLB for Client-Server communication. This way we don’t need to associate or expose the public IP of our OpenVPN server.
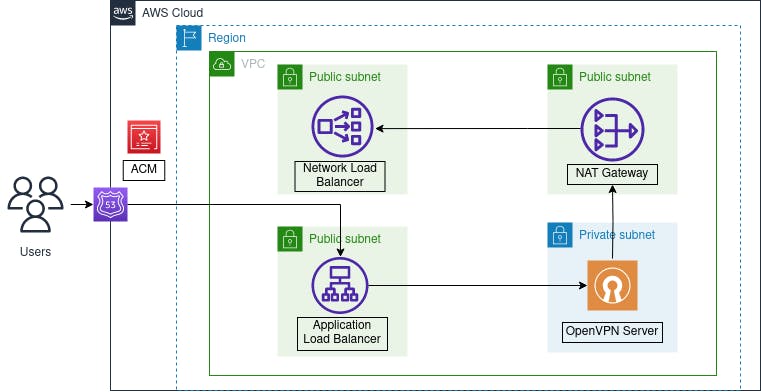
Step 1: Launch OpenVPN Access Server from AWS marketplace. We don’t need any public IP for this instance. Also, launch a bastion server to connect to this instance.
By default, the security group associated with the OpenVPN server allows access to external IPs(0.0.0.0/0). Change it to your VPC CIDR while launching the instance, except for port 1194

STEP 2: Configure the Server
- Login to your bastion host machine and SSH to your openvpn server as
openvpnas:
ssh -i "{keyname}.pem" openvpnas@{Your-IPv4-Private-IP}
Next, type yes for the agreement, then you’ll be prompted with how you want to configure your VPN.
- Type yes for the following 2 prompts:
Should client traffic be routed by default through the VPN?
> Press ENTER for default [no]: yesShould client DNS traffic be routed by default through the VPN?
> Press ENTER for default [no]: yes
Just hit enter for the rest to have all the defaults confirmed.
Once you reached the end, change the password for the user. Enter a new password twice and you’re all set.
sudo passwd openvpn
Step 3: Now our OpenVPN server is up and running, let’s proceed with creating an ALB which will act as a frontend for our OpenVPN instance. For this, we need an SSL certificate as our ALB will listen on port 443.
Step 4: Create an internet-facing ALB with 443 as listener port.
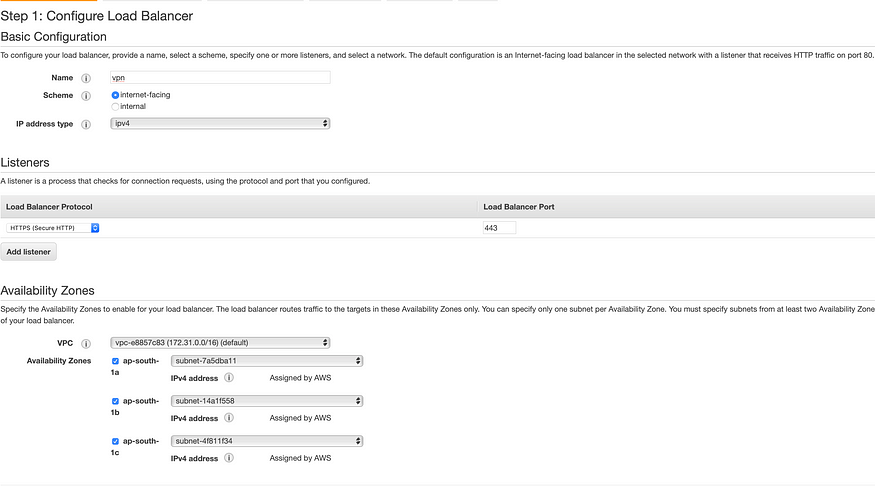
Next, allow open access to port 443 in the security group and create a target group.
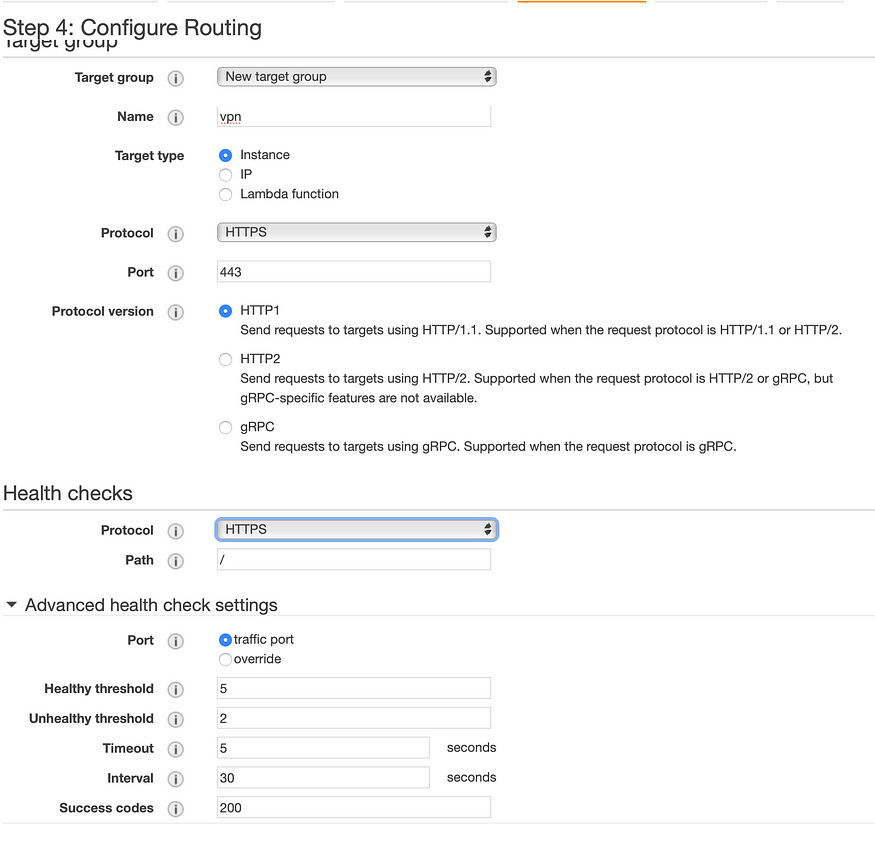
Next Register our OpenVPN server as a target.

Wait for the initial health check to complete and don’t worry if you see failed health check because OpenVPN is internally forwarding the traffic to port 943, that’s why you see a 302 status code. Change the health check setting as below.

Step 5: Now our ALB setup is complete and you can access our VPN server @ HTTPS://. You should see the OpenVPN login screen.

Step 6: DNS Configuration
Configure DNS records to point your VPN domain to the ALB's DNS name.
Consider using Route 53 for DNS management if you're using AWS-provided DNS services.
Step 7: Go to Configuration->Network Settings and you’ll see our instance IP as our VPN server address. We’ll replace it with our NLB.

Step 8: Create an internet-facing NLB which listens on TCP 443 and UDP 1194 ports. Create 2 target groups that forward the traffic to our OpenVPN server on port 443(TCP) and 1194(UDP)

For the nlb1194 target group, override the health check port to TCP 22.

For the nlb443 target group, health check on traffic port i.e 443.
Wait for the health check to be completed successfully.
Step 9: Now go back to the OpenVPN console and replace our instance IP without NLB DNS. After this, Save settings and Update the Running server.
Step 10: Lgoin to OpenVPN console and download our VPN client profile.
Step 11: Import this profile to your OpenVPN client and connect as an OpenVPN user. Now you should be connected to your OpenVPN server which enables us to access our AWS private resources.